
Table of Contents
- Why Köhler Illumination Matters for Spore Microscopy
- Step-by-Step: Setting Up Köhler Illumination Correctly
- How Condensers Shape Image Quality
- Clean Optics: The Hidden Variable in Sharp Spore Imaging
- Preparing Mushroom Liquid Spores and Prints for Imaging
- Troubleshooting Fuzzy, Blurry, or Low-Contrast Spore Images
- Summary: Building a Repeatable Workflow for Crisp Spore Images
- FAQs
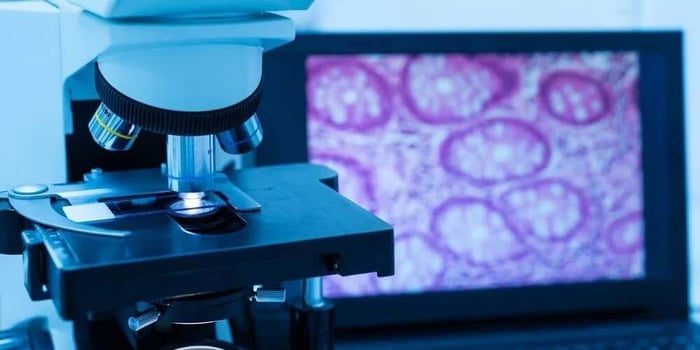
Clear, high-resolution spore imaging is the result of discipline, repeatable technique, and precise illumination control. The difference between a muddy, low-contrast spore photograph and a sharp, publication-grade image often comes down to just three elements: Köhler illumination, a properly adjusted condenser, and clean optical surfaces. For researchers working with Mushroom Liquid Spores, spore prints, dried samples, or curated Functional Spores, these fundamentals determine how much structural detail the microscope can reveal. While it is tempting to focus only on magnification or camera equipment, the truth is that optical alignment produces the foundation on which all imaging clarity depends.
Why Köhler Illumination Matters for Spore Microscopy
Even light distribution and improved contrast
Köhler illumination ensures that the light striking the slide is even from edge to edge. This matters because spores rely on contrast to reveal features such as germ pores, surface textures, wall thickness, and subtle dimensional changes. If one part of the field is brighter than another, details appear to fade or shift. Inconsistent lighting also makes it harder to compare images taken from different sessions, magnifications, or samples. With Köhler correctly set, the entire field becomes a stable, reliable canvas for structural observation.
Eliminating glare, hotspots, and muddy shadowing
When Köhler is not used, the microscope often projects the literal light source into the optical path. This causes hotspots, circular gradients, shadows, and filament patterns. Spores positioned near the center of the field may look brighter, while those near the edges appear dim or blurry. These artifacts can trick researchers into thinking their optics are defective or their slide preparation is flawed. Köhler illumination eliminates these problems by placing the light source in a de-focused plane, creating a smooth, diffuse, shadow-free illumination that highlights genuine specimen detail.
Why spores specifically benefit from precision illumination
Spore imaging depends on tiny differences in contrast and reflectivity. Ornamented spores, such as those with ridges or warts, require directional light to strike their surfaces evenly. Smooth spores rely on subtle tonal differences to stand out from the background. Transparent spores require strong but controlled illumination that enhances boundaries without washing out internal features. Köhler becomes essential for accurate documentation across all spore varieties, regardless of whether you are working with liquid suspensions, fresh prints, dried collections, or specialty Functional Spores.
Step-by-Step: Setting Up Köhler Illumination Correctly
Positioning the condenser
The condenser is the backbone of Köhler illumination. Begin by raising it until it nearly touches the underside of the slide. Then adjust downward slightly until the edges of the field appear crisp. Every objective has a recommended condenser height, but this initial position aligns the system for diaphragm focusing. A misaligned condenser often results in dim images or inconsistent brightness, so this first step is essential.
Focusing the field diaphragm
Close the field diaphragm until its geometric shape becomes visible in the field of view. It will appear blurry at first. Use the condenser focus knob to sharpen it. This physical action aligns the illumination system with the objective’s focal plane. Once the diaphragm edge becomes crisp, you have established the foundation of Köhler illumination, ensuring the microscope is delivering light at the correct height and angle.
Centering the condenser image
After focusing the diaphragm, use the condenser’s centering screws to place the illuminated shape in the exact middle of the field. Even slight misalignment creates uneven brightness that becomes more noticeable at higher magnifications. Proper centering ensures that spores anywhere on the slide receive identical illumination. This step has a dramatic effect on microphotography, preventing uneven contrast that often ruins otherwise well-prepared images.
Setting the aperture diaphragm for optimal resolution
The aperture diaphragm controls the relationship between contrast and resolution. Opening it fully floods the slide with light, increasing brightness but decreasing detail. Closing it too far boosts contrast but sacrifices resolution. A reliable rule is to set it to approximately 70% of the objective’s NA. This gives spores a balanced look that retains fine surface details without excessive glare. For transparent spore varieties, a slightly more closed aperture can help define boundaries.
How Condensers Shape Image Quality
- Condenser NA and objective pairing: The numerical aperture of the condenser should match or exceed that of the objective for optimal resolution. A 40x dry objective with 0.65 NA, for example, performs best when the condenser NA is set near or above this value. Underpowered condenser settings limit the resolving power of the objective, preventing fine textures from appearing in the final image. When imaging spores, especially those with structure variation, condenser NA becomes a crucial variable.
- Brightfield, phase contrast, and darkfield considerations: Different condenser modes reveal different spore attributes. Brightfield is the standard for documentation and provides the most natural appearance of spores in their mounted state. Phase contrast enhances internal boundaries and is particularly effective for transparent spores. Darkfield emphasizes outlines and accentuates ornamentation by filling the field with oblique light. Some researchers rotate between these modes to get a fuller understanding of spore morphology. Regardless of the technique, Köhler illumination forms the base upon which these enhancements rely.
- Common condenser mistakes when imaging spores: Three issues recur frequently in spore microscopy: leaving the condenser too low, forgetting to center it, and using an aperture setting that does not match the objective. Each of these errors introduces image artifacts that mimic poor slide preparation. When spores appear fuzzy at the edges or inconsistently illuminated, the condenser is often the culprit. Revisiting alignment usually resolves the issue.
Clean Optics: The Hidden Variable in Sharp Spore Imaging
Maintaining objectives free of oil, dust, or residue
Even the best illumination cannot overcome dirty optics. Oil residue from immersion lenses transfers easily to dry lenses when objectives are rotated. Dust particles cast shadows that mimic spore structures, confusing the viewer. Before each session, inspect objectives under a bright lamp. Cleaning only when necessary preserves lens coatings while ensuring that images remain as sharp as the optics allow.
Why dirty condensers cause blurry edges and ghosting
The condenser sits below the slide, but dust on its top surface appears in the field as shifting bright spots or faint ghosting. Many researchers misdiagnose this as contamination in Mushroom Liquid Spores or poor slide mounting. In reality, a single dust speck on the condenser can distort the entire field. Cleanliness is therefore crucial for consistent spore imaging.
Safe cleaning procedures for lenses, slides, and coverslips
Proper cleaning follows a simple sequence: blow off debris with compressed air, apply optical fluid to lens paper, and clean in gentle circular motions. Avoid household cleaning cloths or alcohol formulations not designed for coated glass. Coverslips should be inspected for scratches, which can introduce streaks that resemble spore trails. Slides with fingerprints or moisture streaks reduce clarity dramatically at high magnification.
Penis Envy Mushroom Spore Syringe

$22.99
$24.99
PE#6 (Penis Envy 6) Mushroom Spore The Penis Envy #6 Mushroom Spore Syringe from Magic Spore Labs delivers basidiospores from the most systematically refined expression of the Penis Envy lineage available in the Psilocybe cubensis research catalog — a sixth-generation… read more
Preparing Mushroom Liquid Spores and Prints for Imaging
Managing water content and avoiding slide flooding
Liquid suspensions require careful control of water volume. Too much moisture creates uneven surfaces under the coverslip, refracting light unpredictably. This leads to Newton rings, color fringes, and inconsistent focus across the field. Using a micro-drop provides even distribution without flooding the surface. Excess moisture can be wicked away gently with the edge of lens paper.
Preventing spore clumping to improve visibility
Clumping obscures individual spores and prevents accurate documentation. Mix the sample gently before pipetting and consider using a dilution ratio that reduces density on the slide. With Functional Spores designed for controlled research, suspension quality is typically consistent, but handling still matters. Allowing spores to settle evenly before applying the coverslip improves spacing and visibility.
Mounting media considerations: water vs stains vs immersion oil
Water is the most common mounting medium for general microscopy. It preserves natural appearance and avoids distortions introduced by more viscous media. Some stains add contrast, enhancing internal details or ornamentation. Oil immersion is sometimes used with high-NA objectives, but the sample itself should remain mounted in water unless specific structural analysis requires alternative media. Each choice affects how spores interact with light and how accurately their features can be captured.
Troubleshooting Fuzzy, Blurry, or Low-Contrast Spore Images
Diagnosing illumination errors
Uneven brightness, cloudy fields, bright centers, and dim edges almost always indicate misalignment in Köhler illumination. Resetting the process—closing and focusing the field diaphragm, centering it, and adjusting the aperture—restores uniform lighting. Most issues attributed to equipment failure are actually lighting errors.
Fixing condenser misalignment
Because the condenser can shift slightly whenever the microscope is moved, recentering it is important. Misalignment becomes increasingly noticeable at higher magnification. Spores imaged under a misaligned condenser appear stretched or directionally shadowed. Correcting the position resolves these distortions immediately.
When the problem is slide preparation—not optics
Air bubbles create circular voids that scatter light. Layers of spores stacked too thickly produce unpredictable focus points. Dust, fibers, and smudges mimic spore structures and interfere with interpretation. If some areas of the image appear sharp while others remain persistently blurred, the slide is often prepared unevenly. Ensuring proper spacing, clean coverslips, and correct hydration improves consistency across the field.
Summary: Building a Repeatable Workflow for Crisp Spore Images
Sharp spore imaging depends on predictable, repeatable technique. Köhler illumination forms the backbone of this workflow, ensuring even lighting that brings out fine structural details. A properly adjusted condenser allows the microscope to use its full resolving power. Clean optics prevent artifacts that obscure genuine morphology. Thoughtful slide preparation ensures spores are spaced properly, hydrated correctly, and free of debris. Together, these practices produce reliable, high-quality images across all varieties of spores, from liquid suspensions to curated Functional Spores.
FAQs
Why is Köhler illumination better than simple brightfield lighting?
Köhler illumination provides even lighting that eliminates glare and uneven brightness, allowing spores to appear with consistent contrast and maximum clarity across the entire field of view.
Do I need a special condenser for spore microscopy?
Most brightfield condensers work perfectly when properly aligned and adjusted. Phase contrast or darkfield condensers are optional tools that enhance certain features but are not required for basic spore documentation.
How often should microscope optics be cleaned?
Objectives should be inspected before every imaging session and cleaned only as needed. Condensers require less frequent cleaning but should be addressed whenever illumination defects or ghosting become visible during microscopy.